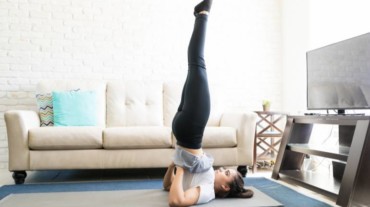
Yes, yoga can even keep your thyroid in check. This shoulderstand routine by our in-house yogini will help you balance your thyroid.
Did you know that as of 2018, 42 million people in India had a thyroid disorder? Needless to say, we Indians are no strangers to hyperthyroidism and hypothyroidism–both of which are caused by the butterfly-shaped thyroid gland in the lower part of the neck.
The thyroid gland regulates our metabolism by secreting a hormone–the overproduction or underproduction of which majorly impacts our weight.
While there are plenty of measures to protect you from a thyroid disorder, yoga guru B. K. S. Iyengar champions sarvangasana or the shoulderstand to balance the thyroid, because it employs a chin lock.
Also, read: Yes, yoga can curb hair fall. These 4 poses will make your mane grow long and strong
So, here we present to you the shoulderstand flow that you must do keep your thyroid gland in check.
Note: Please avoid these poses if you suffer from cervical spondylosis. Yoga novices are advised to practice these only under professional guidance.
1. Begin with the ardhahalasana or the half-plough pose
- Lie on your back with both legs up. Keep your palms down by the side, close to your body.
- Push your shoulders away from your ears so that your arms become longer than the torso.
- Slightly tuck in your chin to straighten the back of your neck.
- Flex your toes and bring your straightened legs closer to the upper body as much as possible. The idea is to apply the weight of the legs on your abdominal muscles.
- At the same time keep pulling down the bottom of your ribcage to contract your abs more.
- Hold this 90 degree pose for at least a minute with normal breathing.
2. Move into sarvangasana or the shoulderstand
- Lift your hips up as much as possible and balance on your shoulders and extended arms. Place the palms on your lower back for support.
- Tuck in your shoulders to bring the elbows closer to each other.
- Squeeze your glutes and push your pelvis back to straighten your spine up and open your chest.
- You will feel that the chin automatically rests on the sternal notch and breathing becomes deeper.
- If your body allows, place your palms a little above your lower back and just below your shoulder blades to open your chest more.
- Hold the pose for at least a minute, only looking towards your toes with complete focus on the breathing.
3. Next, do halasana or the plough pose
- Use your core strength to gently lower your feet to place them on the floor.
- Extend your toes back as much as possible in order to place your hips above your shoulders.
- Extend your arms forward to place the palms on the floor or preferably clasping your fingers together.
- Hold the pose for at least a minute with deep breathing.
4. Come back from the flow with these steps
- Straighten the legs and place the palms on the floor.
- With every exhalation lower your straightened legs by rolling on your back vertebrae by vertebrae using core strength.
- The body is back in the half-plough pose.
- For an extra core workout, tighten your abs more, flatten the lower back on the mat, and completely lower down the legs together on the mat.
5. Finish with the matsyasana or fish pose
- Lift your upper body and place your forearms on the mat so that your elbows are placed under your shoulders.Look towards your feet.
- Extend your toes with your feet together, and push out your chest and push your tailbone back.
- Gently pull your head back to place the top of your head on the mat.
- Feel the stretch in your neck, relax your shoulders and place your palms on the thighs.
- Hold the pose for at least 30 seconds with normal breathing.
- To come back from the pose, lift your head up by placing the elbows on the mat.
- Relax in savasana turning the chin from side to side.
