We are writing this not just for those who are newbies to the world of yoga but even those who have been at it for long. Having a stiff body, being a beginner, or age – whatever your reason is for not cracking yoga poses, we have solutions for you.
But before we begin, we want to share something with you. Usually, people think that simple yoga poses won’t fetch them great results. That’s why without giving a second thought, they hop on to the difficult ones. Due to this, they land up in trouble. From spinal injuries to spasms, something or the other makes it even more difficult to practice yoga.
That’s why, today we are going to break this myth for you, along with yoga expert, Samiksha Shetty, so that you can enjoy yoga, khul ke!
Any time you put pressure on your neck in a yoga asana such as during Headstand, Sarvangasana (Shoulder Stand)/Halasana/ Urdhva Padmasana, it’s an act of compression that can lead to issues with your cervical vertebrae.
Simple alternate to Sirsasana is Downward Facing Dog and Dolphin pose
“I’m sure you’ve heard of this one. It strengthens the arms and shoulders, lengthens the spine, calves, and hamstrings and energizes the entire body,” tell Samiksha Shetty to the Health Shots.
Also, watch:
Start on the floor by placing your hands and knees down. Straighten your legs by lifting your knees off the floor and pushing your heels down as far as they can go. Extend the spine by pushing away from the ground using your palms.
Stay here for 5 to 9 breaths.
To go into the Dolphin pose, hold Downward Facing Dog and then slowly drop your forearms onto the floor and hold.
Asanas like Chakrasana (Wheel pose) or Ushtrasana (Camel Pose) require a deep backward extension of the spine. But the thing with these two yoga poses is that many of you can’t do them because of some or the other reasons. The good thing is that there are various other yoga poses that you can do to get similar, or in fact, better results than these two. Just check out the list of poses below:
Bridge Pose
Start by lying down on the mat on your back. Bend your legs from the knees and place your feet hip-width apart. Inhale lift your hips up to the ceiling pushing into the feet. Exhale slowly with control and drop the hips back onto the floor. Repeat this movement 10 times.

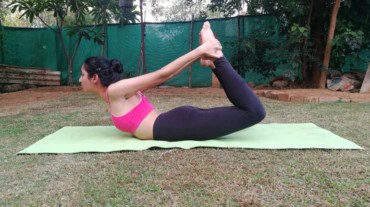
Dhanurasana (Bow Pose)
“Lie down on the floor flat on your stomach. Lengthen your abdomen using your hands. Bend your legs from the knee keeping your knee hip-width apart. Extend your hands behind and grab your ankles from the outside. Right-hand grabs the right ankle and the left-hand grabs the left ankle. Inhale and lift your head, chest, and legs off the floor balancing on your naval and not your pelvis. Pull your ankles away from you towards the ceiling and exhale down,” says Samiksha Shetty.

Padmasana (Lotus Pose)
This is a supreme pose for meditation. But let’s not get too enthusiastic and physically push ourselves into this pose. First, achieve a good outward rotation of your hip.
Fire log pose
Sit on the floor with your knees bent and shins stacked with the right leg on top. Use your hand to position the right heel over the left knee. Keeping your hips squared to the front of the room, hinge at the hips and slowly walk your hands slightly forward extending the spine. Hold for 30 seconds and repeat on the other side.
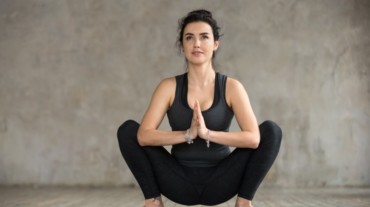
Malasana (Garland Pose)
Take a deep inhale and on the exhal, begin to slowly bend your knees lowering your hip towards the floor. Once your hip is a few inches above the ground, use your upper arms to press your thighs open. Simultaneously, squeeze your thighs inwards so that you feel a lift through the hips. Keep your torso upright and chest lifted. Relax your shoulders. Keep your whole body engaged and hold for 8-10 breaths. Variation- In this pose if your heel raises off the floor then place a rolled towel, yoga mat or block under your heels.

Baddhakonasana (Badda-Bound and Kona-Angle / Butterfly Pose)
Begin by sitting on the floor with your legs stretched out straight in front of you and spine erect. Now, bring the soles of your feet together, bending both your knees out to the side. Place your feet in front of your pelvis, around a fist distance from your groin. Now, take deep breaths and press your thighs and knees down towards the floor providing gentle pressure. In a slow and controlled motion begin to flap both your legs from the hip like the wings of a butterfly for around 60 seconds and then release. Once you come into the position with your feet pressed together. Hold your feet with your hands and open your feet like a book towards the ceiling. Take a deep inhale and when you exhale, bend forward bringing your chin or forehead towards the mat. Hold for 30 to 60 seconds and then on the next inhale, come back up. Just remember to balance your arms with this technique – All arm balance asanas require strong and stable wrists, shoulders, and core.
Also, read: Malaika Arora swears by these 3 yoga asanas for toned legs
Plank pose and side plank
Start on the floor by placing your knees and palms on the mat. Place your hands directly under your shoulders. From here extend your feet back, one at a time. For more stability, bring your feet wider than hip distance apart, and bring them closer for more of a challenge. Maintain a straight line from head to heel. Now, tighten your abs, quads, glutes, and hold. Variations: Practicing high planks and side planks on your hands and low planks and side planks on your forearms.

Hanumansana (Monkey Pose)
This asana is also known as splits i.e. splitting your legs apart. It gives an extreme stretch in the muscles in the thigh, groin, and hamstrings and puts a lot of load on the hip flexors. If done correctly, this could be a powerful energizer.
Wow! You had so many options you had, and you didn’t even know it. Well, now you do and you must make the most of it.
Get Latest Updates on Fitness, Muscle Gain, Staying Fit, Weight Loss